
Using a Nikon D60 as my first DSLR i decided to replace it with a bigger cam that offers me som more options and both better handling and control, so i got me a
used D300 (affiliate link)
A few weeks ago i noticed that the rubber is beginning to loosen and it would be a good idea to have it replaced.
With the family holiday ahead i didn't want my cam to be sent off for a couple of days to the service and i did some recherche about replacing that fhing by myself - all i found, told me that it wouldn't be that hard. So even a technical bum like me should be able to handle it and get if fixed.
After some more recherche i found out, that i could order the needed piece at Nikon Service Munic (Dostal & Rudolph GmbH).
I ordered it and just on the following day i had what was needed.
Now i could start and replace the rubber grip.
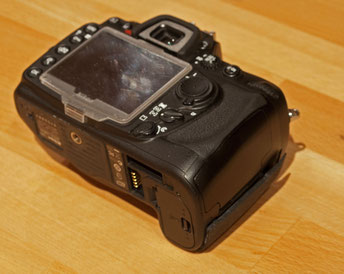
Starting by unscrew a tiny little screw which is located in the battery box and holds the grip in position below the dial wheel - be careful! You don't want to
loose it falling inside the camera, right? ;-)
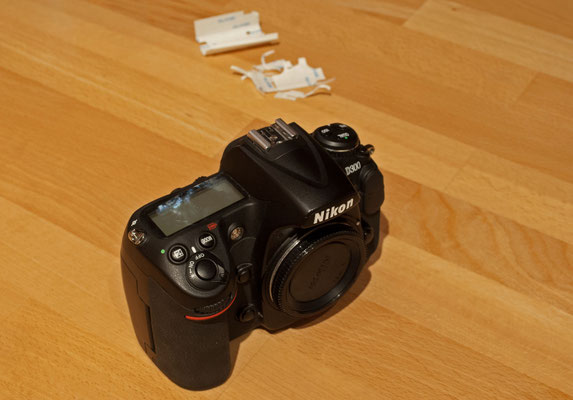
After that just simply remove the old rubber grip and peel of the remaining old glue.
Then you can start to peel off the protective foil from the new rubber grip and glue it on to the cam.
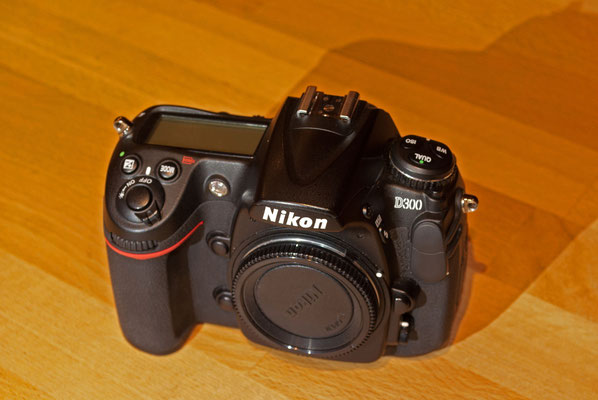
Make sure you got it in place and press it on real tight. Now you can put back in place the little screw, with which we started and you're done.
No big deal - just work for about ten minutes and your cam looks almost as good as new. Most important you're not a single day without a camera.
Below you'll find some Picture that might help to understand what needs to be done. ;-)
Von einer Nikon D60 als mein erste Digitale Spiegelreflex Kamera bin ich Ende 2013 auf eine Grössere umgestiegen die mir mehr Möglichkeiten bot was Einstellungen
und besseres Handling angeht - eine Nikon D300
Vor einigen Wochen, kurz vor dem Familienurlaub musste ich dann feststellen, dass sich die Belederung am Griff vorne, unterhalb es Wahlrädchens begann sich abzulösen. Einschicken wollte ich meine Kamera nicht, so kurz vor dem Urlaub schon gar nicht.
Also habe ich etwas recherchiert und alles was ich zu diesem Thema im Intenet finden konnte sagte mir, dass selbst ich das eigentlich gut hinbekommen würde.
Zurück vom Urlaub fand ich heraus, dass das benötigte Teil bei Nikon Service München (Dostal & Rudolph GmbH) schnell und problemlos zu bekommen ist.
Ein Tag nach Bestellung war das die Belederung dann auch schon in der Post. Nun konnte die Belederung endlich ausgetauscht werden.
Als erstes ist eine kleine Schraube, die die Belederung unterhalb des Blendenwahlrad fixiert, zu lösen - vorsichtig, das Teil macht sich bestimmt nicht allzugut im Inneren der Kamera ;-)
Jetzt kann die alte Belederung abgezogen werden und die Kamera von alten Kleber gereinigt werden.
Nachdem an der neuen Belederung die Schutzfolie abgezogen wurde kann diese nun vorschtig und sorgfältig angeklebt werden - gut und fest andrücken! Die kleine Schraube die wir zu Beginn im Batteriefach entfernt haben kann nun auch wieder angebracht werden.
Aufwand für vielleicht etwas mehr als zehn Minuten, die Kamera sieht wieder so gut wie neu aus und vielleicht am wichtigsten - sie war keinen Tag ausser Haus!
;-)
Unten gibt es noch einige Bilder die evtl. helfen die einzelnen Schritte besser nachzuvollziehen.


Kommentar schreiben
Dia Claro (Mittwoch, 01 Februar 2017 18:17)
Great post. I will be going through many of these issues as well..
Cristen Vandermark (Donnerstag, 02 Februar 2017)
It's truly very complicated in this full of activity life to listen news on TV, thus I simply use the web for that purpose, and obtain the latest information.
Treena Barrio (Freitag, 03 Februar 2017 11:03)
Hi there! Do you use Twitter? I'd like to follow you if that would be okay. I'm absolutely enjoying your blog and look forward to new updates.